向 LLVM JITLink 添加新的目标/对象后端
动机
在过去的一年里,我一直为 LLVM JITLink 做贡献。这篇文章旨在总结我的工作,并为未来想要向 LLVM JITLink 添加新的目标/对象后端的贡献者提供文档。
我们将从建立一些相关概念的背景和定义开始。然后,我们将讨论项目实际包含的内容。最后,我们将回顾项目的执行细节。
项目的最终目标是使 LLVM JITLink 能够将具有 i386 特定重定位的 32 位 ELF 对象文件链接到 i386 硬件架构上的 32 位进程。
如果项目的目标对你来说已经很清楚,并且你想要开始自己向 LLVM JITLink 添加新的目标/对象后端,你可以跳到“回顾和便利”部分。
背景
链接
我们的代码通常依赖于外部依赖项。例如,即使是用 C 语言编写的简单的 hello-world 程序也依赖于 C 标准库中的 printf 函数。这些外部依赖项以符号引用来表示,我将从现在开始将其简称为符号。符号是数据或函数的名称,它们具有未知地址,并在链接过程中被解析或修复。
按时间顺序 -
- 编译器将源代码转换为机器代码。
- 汇编器将机器代码转换为目标文件(ELF、MachO、COFF 等)。
- 链接器链接一个或多个目标文件(在此过程中修复符号引用),并生成可执行文件或共享库(也称为共享对象或 dylib)。
出于本文讨论的目的,我们将重点关注可执行文件,但要说明的要点也适用于共享对象。
JIT 链接
与静态链接不同,JIT(即时)链接是在运行时执行的。静态链接器生成存储在磁盘上的可执行文件,而 JIT 链接器生成可执行文件的内存映像 - 本质上是准备好在内存中执行的字节。JIT 链接 C 程序感觉非常像是运行 shell 脚本。但在幕后,C 程序被链接到调用进程的内存中,也称为执行进程。JIT 链接器修补执行进程的内存以考虑运行时符号的地址,并执行必要的初始化器。
如果您熟悉动态加载,那么 JIT 链接可能听起来很熟悉,两者有许多共同之处,但它们并不相同。JIT 链接操作于可重定位对象(与动态加载的共享对象/dylib 相比),并执行静态链接器和动态加载器的任务。这样做允许 JIT 链接器删除冗余符号,而动态加载无法做到这一点,并且这使得 JIT 链接能够支持对倾向于生成大量冗余符号定义的语言(例如 C++)进行更细粒度的编译。
JIT 链接的必要性
JIT 链接主要在预编译语言(如 C、C++、Rust 等)的上下文中很有用。为什么?在运行时,这些语言无法1将新的符号定义引入到正在运行的进程的内存中,并解决对它们的引用。虽然动态加载部分解决了这个问题,但它也有其缺点(如上所述)并且远远落后于静态链接体验。
使用 JIT 链接,在运行时,符号引用可以解析为现有符号(来自新 JIT 的代码),或解析为新 JIT 的符号(来自预编译的代码)。以下玩具示例显示了代码中的样子。
// Let's assume we have the following, rather contrived,
// C++ program that wants to add 2 numbers, but wants to use
// an `add` function from a relocatable object file supplied by
// the user.
//
// Let's also assume that the add function in the user-supplied
// relocatable object will reference a symbol named `MAGIC` in its
// definition.

const int MAGIC = 42;

int main(int argc, char* argv[]) {
    int a = 1;
    int b = 2;

    // Read the path of the user supplied relocatable object.
    string userSuppliedObjectPath = ...;

    // Initialize your JIT class that uses JIT linking under the hood.
    JIT J;

    // Add the relocatable object to your JIT.
    J.addObject(userSuppliedObjectPath);

    // Lookup the `add` function in the newly added JIT object.
    // Once all symbolic references within the user supplied object
    // are resolved, the content is fixed up and emitted to memory.
    // And we can then get a pointer to the `add` function.
    auto *add = (int(*)(int, int))J.lookup("add").getAddress();

    // At this point the symbolic reference to `MAGIC` in add's
    // definition must have been resolved to the memory address
    // of the constant `MAGIC` that we defined in this program.

    // Run the add function found in the JIT module.
    int result = add(a, b);
}
也就是说,JIT 链接本身对最终用户来说并不是很有用。JIT 链接是针对预编译语言的某些用例的启用器(也存在针对 JIT 编译语言的某些用例2)。
- JIT 编译器(可以想到类似于 Java Hotspot VM 的 JIT 编译组件,但适用于静态编译的语言)。
- 调试器表达式评估器(例如 LLDB 表达式评估器)。
- REPL(例如 Cling 和当前实验性的3 Clang-REPL)。
- 独立脚本(例如 Swift 脚本,其中 JIT 链接用于向编译器添加 立即 模式,该模式通过 JIT 在本地运行您的代码,而不是编译它)。
- 可脚本化扩展(可以想到在某些现有应用程序的上下文中运行 JIT 的代码,允许应用程序通过 JIT 的代码而不是预编译的插件进行扩展)。
虽然上面的用例可能看起来不同,但实际上它们是相同的 - JIT 链接使代码能够以与 ABI 兼容的方式链接到现有的进程(可能已经包含状态/上下文)中。
LLVM JITLink
LLVM JITLink 是一个 JIT 链接实现,以 LLVM 基础设施中的低级库的形式存在。它为 LLVM 的 ORC JIT API 提供支持,这是最终用户通常用于构建运行时链接环境的内容。它提供以下原语:
- 在运行时重新使用现有编译器生成可重定位对象。
- 在目标执行进程中分配内存。
- 以与 ABI 兼容的方式将代码链接到目标执行进程。
简单来说,运行在进程 X 中的程序 Y 可以向 JITLink 传递一个可重定位对象文件,JITLink 将把对象文件中的代码链接到 X 的内存中并在 X 的现有上下文中(全局变量、函数等)运行它,就好像它是加载到进程 X 中的动态库的一部分4。
项目
在设置了所有这些背景之后,让我们了解项目的主要任务和最终目标。
任务 - 向 JITLink 添加 i386(目标)/ELF(对象)后端
- 什么是目标?
- 这里的目标是指硬件架构。i386 是一个 32 位 x86 架构。
- 什么是对象?
- 这里的对象是指目标文件格式。ELF 是 Linux 系统中常用的目标文件格式。
- 为什么不同的目标/对象组合很重要,需要额外的工作?
- 不同的目标/对象组合很重要,因为每个组合可能使用不同的方法来连接符号引用和符号定义。这些方法通常称为 重定位。
最终目标
项目的最终目标是使 LLVM JITLink 能够将具有 i386 特定重定位的 32 位 ELF 对象文件链接到 i386 硬件架构上的 32 位进程。
执行
理解高级构造
LinkGraph
LLVM JITLink 文档 对 LinkGraph 有很好的描述。我建议您在阅读以下关于 LinkGraph 的高级描述后,再阅读它。
LinkGraph 是 LLVM JITLink 中目标文件的内部表示。虽然目标文件格式可能具有不同的模式和术语来表示类似的概念,但它们都旨在表示可以在虚拟内存中重新定位的机器代码。LinkGraph 的目的是跨不同的目标文件格式提供对这些概念和细微差别的通用表示。
为了在 LinkGraph 和目标文件格式之间进行概念类比,让我们以 ELF 为例。ELF 对象包含
- 节 - 任何必须作为一个单元移动到内存中的字节块。
- 符号 - 可能表示数据或可执行指令的命名字节块。符号作为节的子项出现。
- 重定位 - 描述如何在解析重定位的目标符号的地址后修复节中的字节。
LinkGraph 能够表示所有上述概念。它首先定义了一些构建块。
在这些构建块之上,它定义了更高级的目标文件格式概念。
- 符号 - 等同于 ELF 格式中的符号。使用相对于块(地址)的基址的偏移量和字节大小来表示。
- 节 - 等同于 ELF 格式中的节。使用符号和块的集合来表示。
- 边 - 等同于 ELF 格式中的重定位。使用相对于包含块的起始位置的偏移量(指示需要修复的存储位置)来表示,指向需要使用其地址进行修复的目标的指针以及指定修补公式的类型。
JITLinkContext
JITLinkContext 表示您要链接到的目标进程,它为 JIT 链接器提供了询问进程并采取行动的能力。这包括能够在目标进程中查找符号和分配内存,以及将链接过程的结果发布到更广泛的环境中。具体来说,JITLinkContext 将它分配给符号的地址以及这些符号何时在内存中可用通知给其他人。
理解 JIT 链接算法
LLVM JITLink 链接算法分多个阶段进行,每个阶段都包括对 LinkGraph 进行多次传递,并在最后调用下一个阶段。在每个阶段中,算法根据需要修改 LinkGraph,最后生成我们开始使用的可重定位对象的准备执行的内存映像。
有一点我一开始没有明白,但一旦明白了就大大简化了事情,那就是 LinkGraph 只是一个图!用这种对 LinkGraph 的简单视图重新阅读 LLVM JITLink 对 通用 JIT 链接算法 的高级描述,使得理解 JIT 链接过程中发生的事情变得容易和直观得多。
该算法还为 JITLink 的实现者和用户提供了钩子,用于介入链接过程。这些钩子可用于实现许多事情,包括但不限于链接时优化、测试、验证等。
有形的成果
首先,我设置了一个测试循环,以验证 LLVM JITLink 是否能够将包含有效 i386/ELF 重定位的 32 位 i386 ELF 对象链接到 32 位进程中。现有的 llvm-jitlink 工具,在构建 LLVM 项目时默认情况下会构建并放到 bin 文件夹中,非常有用。llvm-jitlink 是 JITLink 库的命令行包装器。它将可重定位对象作为输入,并使用 JITLink 将它们链接到执行器进程中。
这里最棘手的部分,至少对我来说,是获得一个 32 位的 llvm-jitlink ELF 可执行文件。默认情况下,Clang 会为主机架构生成可执行文件,因此我不得不了解交叉编译5(为与主机架构不同的目标编译),因为我在 x86-64 硬件上进行开发。为了在 x86-64 系统上获得 32 位的 llvm-jitlink ELF 可执行文件,我需要以下内容 -
-
交叉编译器 - 能够生成 32 位 x86 代码的交叉编译器。如果在构建配置中指定了以下标志,Clang 会生成 32 位 x86 代码
CMAKE_CXX_FLAGS="-m32"或CMAKE_C_FLAGS="-m32"- 指示 Clang 生成 32 位代码,而不是默认的 64 位代码。LLVM_DEFAULT_TARGET_TRIPLE=X86- 指示 Clang 默认情况下为 x86 目标生成机器代码。
-
目标共享库 - 32 位 x86 共享库,这些库可能在编译期间被检查。在我的情况下,安装
libstdc++.i686和glibc-devel.i686就足够了,因为这是我生成包含所有可能的 i386/ELF 重定位的程序所需的一切。
我用来生成构建配置的完整命令是 -
cmake -DCMAKE_CXX_FLAGS="-m32" -DCMAKE_C_FLAGS="-m32" \
-DCMAKE_CXX_COMPILER=<PATH_PREFIX>/bin/clang++ \
-DCMAKE_BUILD_TYPE=Debug \

// It is important that the `llvm-tblgen`executable is for the host architecture
-DLLVM_TABLEGEN=<LLVM_BUILD_DIR_FOR_HOST_ARCH>/bin/llvm-tblgen \

-DLLVM_DEFAULT_TARGET_TRIPLE=i386-unknown-linux-gnu \

// Set of targets that the compiler must be able to generate code for.
// Can save compilation time by omitting redundant target backends.
-DLLVM_TARGETS_TO_BUILD=X86 \

-G "Ninja" ../llvm
我测试循环的最后一部分是在 LLVM JITLink 之上进行管道连接,我可以开始添加 i386/ELF 重定位。我将此管道作为我对 LLVM JITLink 的第一个提交的一部分添加。从高层次上看,我在该提交中实现了 2 个东西 -
- ELFLinkGraphBuilder_i386 - 包含用于从目标文件解析 i386/ELF 重定位的专用逻辑。
- ELFJITLinker_i386 - 包含用于在要发出到内存的可执行映像中修复 i386/ELF 重定位的专用逻辑。
设置了测试循环后,我逐步为 LLVM JITLink 添加了对以下 i386/ELF 重定位的支持。
在讨论单个重定位之前,先简要说明一下!让我们回顾一下重定位是什么。
编译器生成的代码包含对实际符号的符号引用(函数中除局部变量和函数本身以外的所有内容)。编译器只是使用程序员使用的名称来引用符号,并将一组 TODO 留给链接器在链接期间完成。
在 ELF 对象中,这些 TODO 位于重定位部分。它们告诉链接器需要在何处以及如何修复符号引用。然后,链接器在大多数情况下遵循编译器的指令,并解决程序中的所有重定位。链接器能够解决重定位,因为它可以查看整个已编译程序。
- R_386_32
- 含义 - 告诉链接器用符号的绝对内存地址替换符号引用。
- 何时使用 - 用于在非位置无关代码 (PIC) 中引用全局变量和静态变量。PIC 允许代码加载到内存中的任何地址,而不是固定的地址。
- 代码 -
// Compile with => clang -m32 -c -o obj.o obj.c

// declare a global variable x
int x;

int main() {
    // Compiler should generate a R_386_32 relocation here.
    x += 1;
    return 0;
}
00000000 <main>: 0: 55 push %ebp 1: 89 e5 mov %esp,%ebp 3: 50 push %eax 4: c7 45 fc 00 00 00 00 movl $0x0,-0x4(%ebp) // Compiler wants to move the value of x into // the eax register but doesn't know the address // of x. So it leaves a TODO for the linker and // temporarily uses 0 as x's address. b: a1 00 00 00 00 mov 0x0,%eax c: R_386_32 x 10: 83 c0 01 add $0x1,%eax // Same thing here 13: a3 00 00 00 00 mov %eax,0x0 14: R_386_32 x 18: 31 c0 xor %eax,%eax 1a: 83 c4 04 add $0x4,%esp 1d: 5d pop %ebp 1e: c3 ret
- R_386_PC32
- 含义 - 告诉链接器使用符号相对于当前程序计数器 (PC) 的相对偏移量来解析符号引用。链接器找到引用符号相对于 PC 的偏移量,并将其硬编码到相应的汇编指令中。在运行时,处理器查看调用指令的编码,并知道指令的操作数代表符号相对于 PC 的偏移量。
- 何时使用 - 用于在 PIC 中调用函数。
- 代码 -
// Compile with => clang -m32 -ffunction-sections -c -o obj.o obj.c

 // declare a global function x
 void x {}

 int main() {
     // Compiler should generate a R_386_PC32 relocation here.
     x();
     return 0;
 }
00000000 <x>: 0: 55 push %ebp 1: 89 e5 mov %esp,%ebp 3: 5d pop %ebp 4: c3 ret 00000000 <main>: 0: 55 push %ebp 1: 89 e5 mov %esp,%ebp 3: 83 ec 08 sub $0x8,%esp 6: c7 45 fc 00 00 00 00 movl $0x0,-0x4(%ebp) // Compiler wants to call function x // but doesn't know its address. So it leaves // a TODO for the linker and temporarily uses garbage // bytes as x's address. // // The linker will replace the garbage bytes 0xfffffffc // with `offset => PC - address of x`. // `e8` here tells the i386 processor that the operand // is a PC relative offset and that the address of x needs // to be computed using `PC + offset` d: e8 fc ff ff ff call e <main+0xe> e: R_386_PC32 x 12: 31 c0 xor %eax,%eax 14: 83 c4 08 add $0x8,%esp 17: 5d pop %ebp 18: c3 ret
关于动态链接的另一个简短说明,因为剩下的重定位是使动态链接成为可能的因素。
在静态链接中,如果你的程序访问了给定库中的单个符号,那么整个库都会与你的程序链接,这会增加生成的可执行文件的大小,还会导致其他问题。例如,让我们再次谈论那个简单的 C 程序,它只是打印 hello world。使用静态链接,从你的程序生成的执行文件将拉入整个 C 标准库,因为你的程序访问了 printf 函数。
在动态链接中,引用库在构建时被访问,但它们不会被带入链接的可执行文件。相反,这些库中引用的全局变量在加载时链接(当程序加载到内存中以运行时),这些库中引用的函数在调用时链接。
两种方法各有优缺点,我不会详细说明,但会在下面简要提一下。
使用静态链接,你的可执行文件的用户只需要可执行文件本身。他们不会遇到缺少库的问题。
使用动态链接,如果共享库更新了,你就不需要更新你的可执行文件。这在你分发可执行文件时特别有用。
动态链接的实现难度要高于静态链接。
如果你还不熟悉 GOT 和 PLT 的概念,我建议你再进行一次快速说明,以获得一些视觉解释!
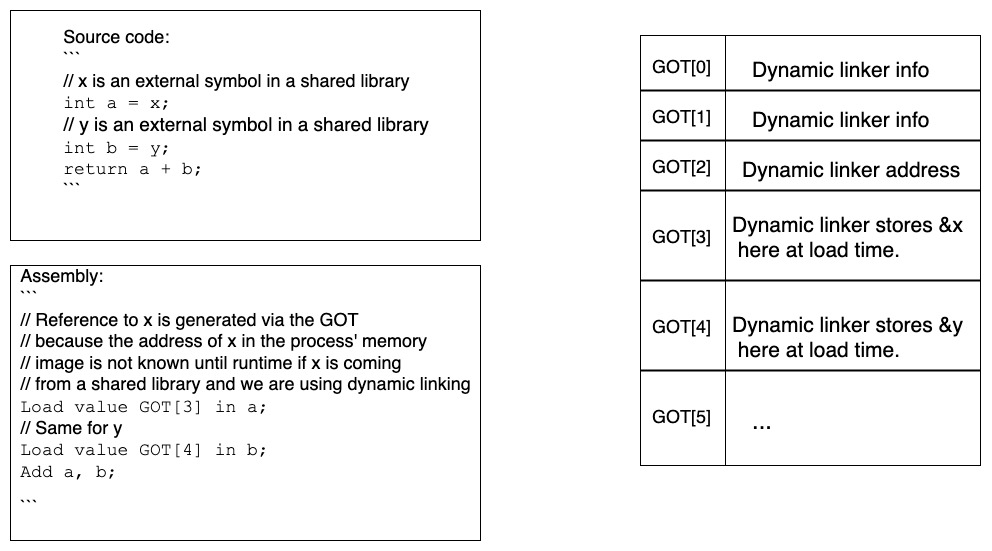
- R_386_GOTPC -
- 含义 - 告诉链接器用存储位置(必须应用重定位的位置,即修复位置)和 GLOBAL_OFFSET_TABLE (GOT) 符号地址之间的差值替换符号引用。
- 何时使用 - 此重定位不会单独使用。相反,它是 R_386_GOTOFF、R_386_GOT32 和 R_386_PLT32 的使能器,它们需要使用 GOT 的内存地址。
- 代码 -
// Compile with => clang -m32 -fPIC -c -o obj.o obj.c

// Declare a global static
static int a = 42;

int main() {
    // Since we passed the `PIC` flag to Clang to
    // indicate that we want position independent code
    // Clang will generate code to access `a` using
    // the GOT.
    return a;
}
00000000 <main>: 0: 55 push %ebp 1: 89 e5 mov %esp,%ebp 3: 50 push %eax // This `call` instr is just telling the processor to // push the next instr's address on the stack and jump to // address 9. But 9 is the address of the next line. That's // weird... 4: e8 00 00 00 00 call 9 <main+0x9> // And now that we did jump to 9, all we did was pop // the value that was on the stack and store it in ebx. // Wasn't the value on the stack just 9's address? Even // weirder... 9: 58 pop %ebx // Wait a minute. The compiler left a TODO here for the // linker, to find the delta between the fixup location // and the address of the GOT. // // Ok, so if the address of the GOT was let's say 20, // then the linker will try to hardcode the value // `0x20-0xc => 0x14` and add it to the value in eax (0x9), // which will give us `0x14 + 0x9 => 0x1d`. // // Ah, that's not the address of the GOT. Yes, but // `0x1d + 0x3 => 0x20` is. Well, where is the 3 coming from? // The compiler helps us here, a bit. The address in eax isn't // the address of the fixup location it's off by 0x3. So along // with leaving us a TODO, the compiler also leaves us a reminder // to add 0x3 to our delta calculation, in order to arrive at // the correct address of the GOT. a: 81 c0 03 00 00 00 add $0x3,%ebx c: R_386_GOTPC _GLOBAL_OFFSET_TABLE_ // Not super important what happens after the R_386_GOTPC // relocation is resolved for now...
- R_386_GOTOFF -
- 含义 - 告诉链接器使用符号地址和 GOT 基地址(在处理 R_386_GOTPC 重定位时计算并存储在一个寄存器中)之间的偏移量来解析符号引用。
- 何时使用 - 共享库和可执行文件使用此重定位以位置无关的方式访问内部符号。
- 代码 -
// Compile with => clang -m32 -fPIC -c -o obj.o obj.c

// Declare a global static
static int a = 42;

int main() {
   // Since we passed the `PIC` flag to Clang to
   // indicate that we want position independent code
   // Clang will generate code to access `a` using
   // the GOT.
   return a;
}
00000000 <main>: 0: 55 push %ebp 1: 89 e5 mov %esp,%ebp 3: 50 push %eax 4: e8 00 00 00 00 call 9 <main+0x9> 9: 58 pop %eax // We saw above how the R_386_GOTPC relocation gets resolved // and that the ebx register contains the address of the // GOT after the relocation is resolved. a: 81 c0 03 00 00 00 add $0x3,%ebx c: R_386_GOTPC _GLOBAL_OFFSET_TABLE_ 10: c7 45 fc 00 00 00 00 movl $0x0,-0x4(%ebp) // Compiler wants to access `a`, but since we told it // to generate position-independent code, it generates access // to `a` using the GOT and leaves a TODO for the linker to find // the offset of `a` from the base of the GOT. // // The linker already knows the address of the base of the GOT // at this point - it's stored in ebx. It computes the address of // `a` and fixes up the 4 bytes after `0x8b 0x80`, to store the // offset between `a` and the GOT's base. 17: 8b 80 00 00 00 00 mov 0x0(%ebx),%eax 19: R_386_GOTOFF a 1d: 83 c4 04 add $0x4,%esp 20: 5d pop %ebp 21: c3 ret
- R_386_GOT32
- 含义 - 告诉链接器使用 GOT 基地址和符号在 GOT 中的条目之间的偏移量来解析符号引用(本质上是计算 GOT 中的索引)。
- 何时使用 - 共享库和可执行文件使用此重定位以位置无关的方式访问外部数据符号。
- 代码 -
// Compile with => clang -m32 -fPIC -c -o obj.o obj.c

// Declaring that `a` is defined externally.
extern int a;

int main() {
    // Since we passed the `PIC` flag to Clang to
    // indicate that we want position independent code
    // Clang will generate code to access `a` using
    // the GOT.
    return a;
}
00000000 <main>: 0: 55 push %ebp 1: 89 e5 mov %esp,%ebp 3: 50 push %eax 4: e8 00 00 00 00 call 9 <main+0x9> 9: 59 pop %ecx // We saw above how the R_386_GOTPC relocation gets resolved // and that the ebx register contains the address of the // GOT after the relocation is resolved. a: 81 c1 03 00 00 00 add $0x3,%ebx c: R_386_GOTPC _GLOBAL_OFFSET_TABLE_ 10: c7 45 fc 00 00 00 00 movl $0x0,-0x4(%ebp) // Compiler wants to access `a`, but since we told it to // generate position-independent code, it generates access to // `a` using the GOT and leaves a TODO for the linker to find // the offset of `a`'s GOT entry from the base of the GOT. // // `a` got a GOT entry because we did not define it internally // and the compiler thinks that it will either come from another // source file or a shared library. // // The linker already knows the address of the base of the GOT // at this point - it's stored in ebx. It finds the address of // `a`'s GOT entry and fixes up the 4 bytes after `0x8b 0x81`, // to store the offset between `a`'s GOT entry and the GOT's base. 17: 8b 81 00 00 00 00 mov 0x0(%ebx),%eax 19: R_386_GOT32 a // eax, at this point contains `a`'s address, which is dereferenced // in this mov instruction and stored into eax itself. 1d: 8b 00 mov (%eax),%eax 1f: 83 c4 04 add $0x4,%esp 22: 5d pop %ebp 23: c3 ret
- R_386_PLT32
- 含义 - 告诉链接器使用符号的 PLT 条目来解析符号引用。
- 何时使用 - 共享库和可执行文件使用此重定位以位置无关的方式访问外部函数符号。
- 代码 -
// Compile with => clang -m32 -fPIC -c -o obj.o obj.c

// Declaring that `foo` is a function defined externally.
extern int foo(void);

int main(void) {
    // Since we passed the `PIC` flag to Clang to
    // indicate that we want position independent code
    // Clang will generate code to access `foo` using
    // the PLT.
    return foo();
}
00000000 <main>: 0: 55 push %ebp 1: 89 e5 mov %esp,%ebp 3: 53 push %ebx 4: 50 push %eax 5: e8 00 00 00 00 call a <main+0xa> a: 5b pop %ebx // We saw above how the R_386_GOTPC relocation gets resolved // and that the ebx register contains the address of the // GOT after the relocation is resolved. b: 81 c3 03 00 00 00 add $0x3,%ebx d: R_386_GOTPC _GLOBAL_OFFSET_TABLE_ 11: c7 45 f8 00 00 00 00 movl $0x0,-0x8(%ebp) // Compiler wants to access `foo`, but since we told it to // generate position-independent code, it generates access to // `foo` using its PLT entry and leaves a TODO for the linker to // find `foo`'s PLT entry address. // // The PLT machinery was explained here! 18: e8 fc ff ff ff call 19 <main+0x19> 19: R_386_PLT32 foo 1d: 83 c4 04 add $0x4,%esp 20: 5b pop %ebx 21: 5d pop %ebp 22: c3 ret
测试
虽然我之前谈到了设置“测试循环”,但在这里我想简要介绍一下回归测试的主题 - 不是“为什么”和“是什么”,而是“怎么做”。LLVM 项目中已经有一些优秀的测试实用程序,但我发现相关文档滞后。具体来说,我想重点介绍一下在编写 LLVM JITLink 目标对象后端的回归测试时可能会用到的实用程序。
在我们继续之前,我想提一下有关 LLVM 的高级测试指南。该指南应该能让你了解到如何创建测试文件、如何使你的测试能够被测试运行程序(LLVM 集成测试程序 - lit)发现,以及如何使用测试运行程序运行测试。
也就是说,让我们使用下面的示例测试文件来讨论在编写 LLVM JITLink 目标对象后端的回归测试时可能会用到的实用程序。
// Regression test files are assembly files (".s" extension).

// The files must begin with what are known as "RUN" lines.
// Each "RUN” line tells lit how to run the test file.
// RUN lines look and feel like you were running shell commands.

// Each regression test will likely begin with the following
// two RUN lines, although the exact RUN command may need to be
// modified, based on the test cases need.

# RUN: llvm-mc -triple=i386-unknown-linux-gnu -position-independent -filetype=obj -o %t.o %s

// Notice how llvm-jitlink is run with the "-noexec" option.
// The option tells llvm-jitlink to not run the code loaded
// to memory. This is important because JITLink may be linking
// and loading code for an architecture different from the one
// where the regression test is running in LLVM's build/release
// pipeline.
# RUN: llvm-jitlink -noexec %t.o

// llvm-jitlink also requires each file to have a "main" function.
// Your test code can go here, but it doesn't have to.
.text
.globl  main
.p2align        4, 0x90
.type   main,@function
main:
    ret
.size   main, .-main
我们希望在这些目标对象后端回归测试中确定的是,发出到内存的代码中的重定位是否已正确修复。也就是说,我们必须逐字检查特定内存位置中的某些字节是否符合预期。让我们看一下一些更复杂的测试用例,这些用例将展示我们可能需要执行的不同类型的检查以及如何执行这些检查。
// llvm-jitlink allows you to specify jitlink-check expressions.
// jit-link check expressions are checks against working memory.

// jit-link check expressions can be used with the `decode_operand` function.
// `decode_operand` decodes the instruction at the given label
// and then accesses the operand number that you have specified.
//
// For the expression below, decode operand decodes the operand at the
// label `foo`, accesses its 0th operand `external_data` and checks whether
// its value is equal to the bytes represented by `0xDEADBEEF`.
//
// Note - The operand number does not always have a one-to-one mapping
// with what you see and while in this case `external_data` was indeed the
// 0th operand of the instruction, for another instruction its operand
// number may have been different.
# jitlink-check: decode_operand(foo, 0) = 0xDEADBEEF
     .globl foo
    .p2align 4, 0x90
    .type foo,@function
foo:
    movl external_data, %eax
.size foo, .-foo


// The RHS of jitlink-check expressions doesn't have to be literal
// bytes. It can be an expression of labels and other functions over
// labels.
//
// In the below jitlink-check expression, the RHS
// is calculating the difference between the address of the label
// `foo` and the address of the program counter when the instruction at label
// `bar` is executed.
# jitlink-check: decode_operand(bar, 0) = foo - next_pc(bar)
     .globl bar
    .p2align 4
    .type bar,@function
bar:
    calll foo
.size bar, .-bar

// The `got_addr`function can also be used on the RHS, to access the
// address of the GOT entry of a symbol.
//
// In the below jitlink-check expression, the RHS is calculating the
// offset between the GOT entry for the symbol `named_data` and the
// GOT symbol itself.
# jitlink-check: decode_operand(test_got, 4) = got_addr(test_file_name.o, named_data) - _GLOBAL_OFFSET_TABLE_
     .globl test_got
     .p2align 4, 0x90
     .type test_got,@function
test_got:
    leal named_data@GOT, %eax
.size test_got, .-test_got

// The LHS of a jitlink-check expression, can also be constructed manually
// by "casting" a symbol, label or a function over a label to a machine register
// size pointer.
//
// In the below jitlink-check expression the LHS is constructed by casting the
// address of the GOT entry for `named_data` to a 32-bit pointer. The constructed
// pointer is then dereferenced and compared against the `named_data` label.
# jitlink-check: *{4}(got_addr(test_file_name.o, named_data)) = named_data
    .globl test_got
    .p2align 4, 0x90
    .type test_got,@function
test_got:
    leal named_data@GOT, %eax
.size test_got, .-test_got


// NOTE - The above presented flavors of jitlink-check expressions is not an
// exhaustive list of what's available. Rather it's just a summarization of some
// of the ways in which I used jitlink-check expressions.
回顾和便利
我们已经涵盖了很多内容。让我们快速回顾一下我们讨论的内容。
- 我们建立了理解该项目所需的上下文。我们定义了基本概念 - 链接和 JIT 链接,并讨论了 JIT 链接和 LLVM JITLink 的必要性。
- 我们建立了对该项目是什么的理解。
- 我们回顾了该项目的执行细节。我们讨论了重要的高级结构,LLVM JITLink 使用的高级 JIT 链接算法,设置用于持续反馈的测试循环以及作为 i386/ELF 后端一部分添加的每个重定位的详细信息。
- 最后,我们讨论了可用于编写该项目回归测试的工具和实用程序。
资源
以下是我发现有用的资源索引(我也可能在文章的其他地方提到过它们)。
- Chris Kanich 的视频,来自芝加哥伊利诺伊大学的系统编程课程
- Lang Hames 的视频(1、2 和 3)关于 LLVM ORC API 和 JITLink。这些视频对于理解 JITLink 的存在理由及其使用环境非常有价值。
- John R. Levine 编写的《链接器和加载器》
- Oracle 的《链接器和库指南》
- LLVM JITLink 文档
- LLVM 测试基础设施指南
- Eli Bendersky 关于位置无关代码和共享库的加载时重定位的文章。
开发便利
- 开发环境设置
- 构建系统
- 使用
ninja!它比make快得多。 - 如果你要构建一个
llvm-jitlink二进制文件(你可能需要用于测试),只需从构建文件夹的根目录运行ninja llvm-jitlink即可。这样可以避免构建不需要的其他目标,并且完成速度会快得多。 - 除此之外,我不会在这里说太多,因为一个人的构建系统配置很少能在另一个人的机器上工作。
- 使用
- 您将要处理的文件
- 您可能会处理 llvm/lib/ExecutionEngine/JITLink 下的文件。
- 为 i386/ELF 和 AArch64/ELF 后端提供的介绍性提交将为您提供一个关于最小后端实现看起来如何的非常好的想法。请记住,这些第一个提交是为了现有的对象格式(在本例中为 ELF)的后端。如果您正在添加对没有现有对象格式的后端的支持,您可能需要寻求帮助(稍后将详细介绍)。
- 代码审查
- 安装 arcanist - 为 LLVM 做出贡献时创建代码审查的工具。
- 安装完成后,您将使用的主要命令是(假设您使用 git 作为您的版本控制)-
- arc diff - 用于创建代码审查和新修订。
- arc land - 一旦代码审查被批准,用于关闭代码审查并将更改推送到远程。
- 寻求帮助
- #jit LLVM Discord 服务器的频道。
结束语
就是这样!除了已经说过的内容之外,我没有什么要说的了。为 LLVM JITLink 做出贡献是一个很棒的学习经历。我建议任何想了解编译后的故事以及程序运行前的故事的人 - 欢迎在 LLVM Discord 服务器的 #jit 频道上打个招呼!
我还想感谢 #jit 频道中帮助我理解事物并回答我问题的人们。还要特别感谢 Lang Hames 在整个项目中提供的帮助并审查了这篇文章(感谢 Stefan Gränitz 和 Vassil Vassilev 的审查!)。
我计划继续参与 LLVM 和 JITLink,并期待着接下来会学到什么!
附录
什么是 GOT 和 PLT?
GLOBAL_OFFSET_TABLE (GOT) 和 PROCEDURE_LINKAGE_TABLE (PLT) 是链接过程中使用的两个表,它们使动态链接能够正常工作。动态链接的代码需要是位置无关的6,这意味着它应该能够加载到内存中的任何地址并继续工作 - 它引用的所有符号以及它包含的所有被引用符号都必须可以解析。动态链接的共享库可以使用 pc 相对寻址来满足内部符号的位置无关性要求,因为共享库的代码在内存中保持在一起。但是,这些库也可能引用外部符号或包含被其他共享库或主可执行文件引用的符号。由于共享库在内存中的加载地址不是固定的,因此它们需要另一层抽象来解析外部符号,包括数据和函数。GOT 和 PLT 就是这些抽象。
以下是一些简单的视觉示例,用于理解 GOT 和 PLT。
- 通过 GOT 访问数据符号
-
通过 PLT 访问函数符号
-
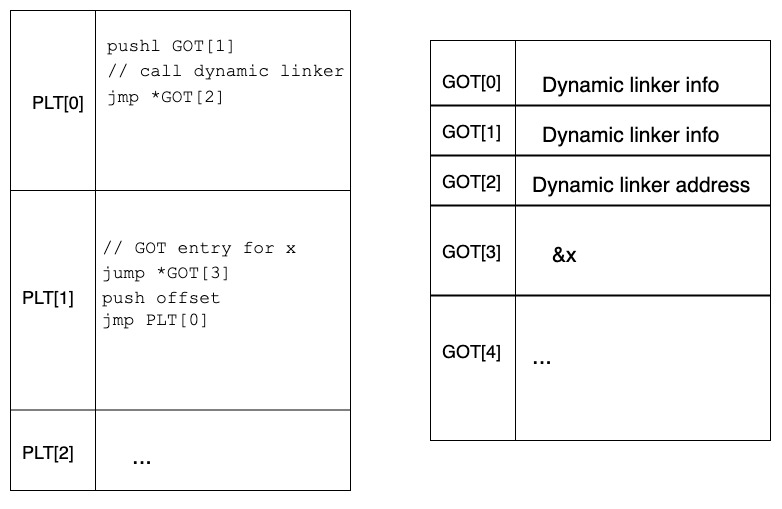
在加载时
- 对 x 的调用是通过 PLT 生成的。
- GOT 中也存在 x 的条目,其用途将在稍后变得清晰。
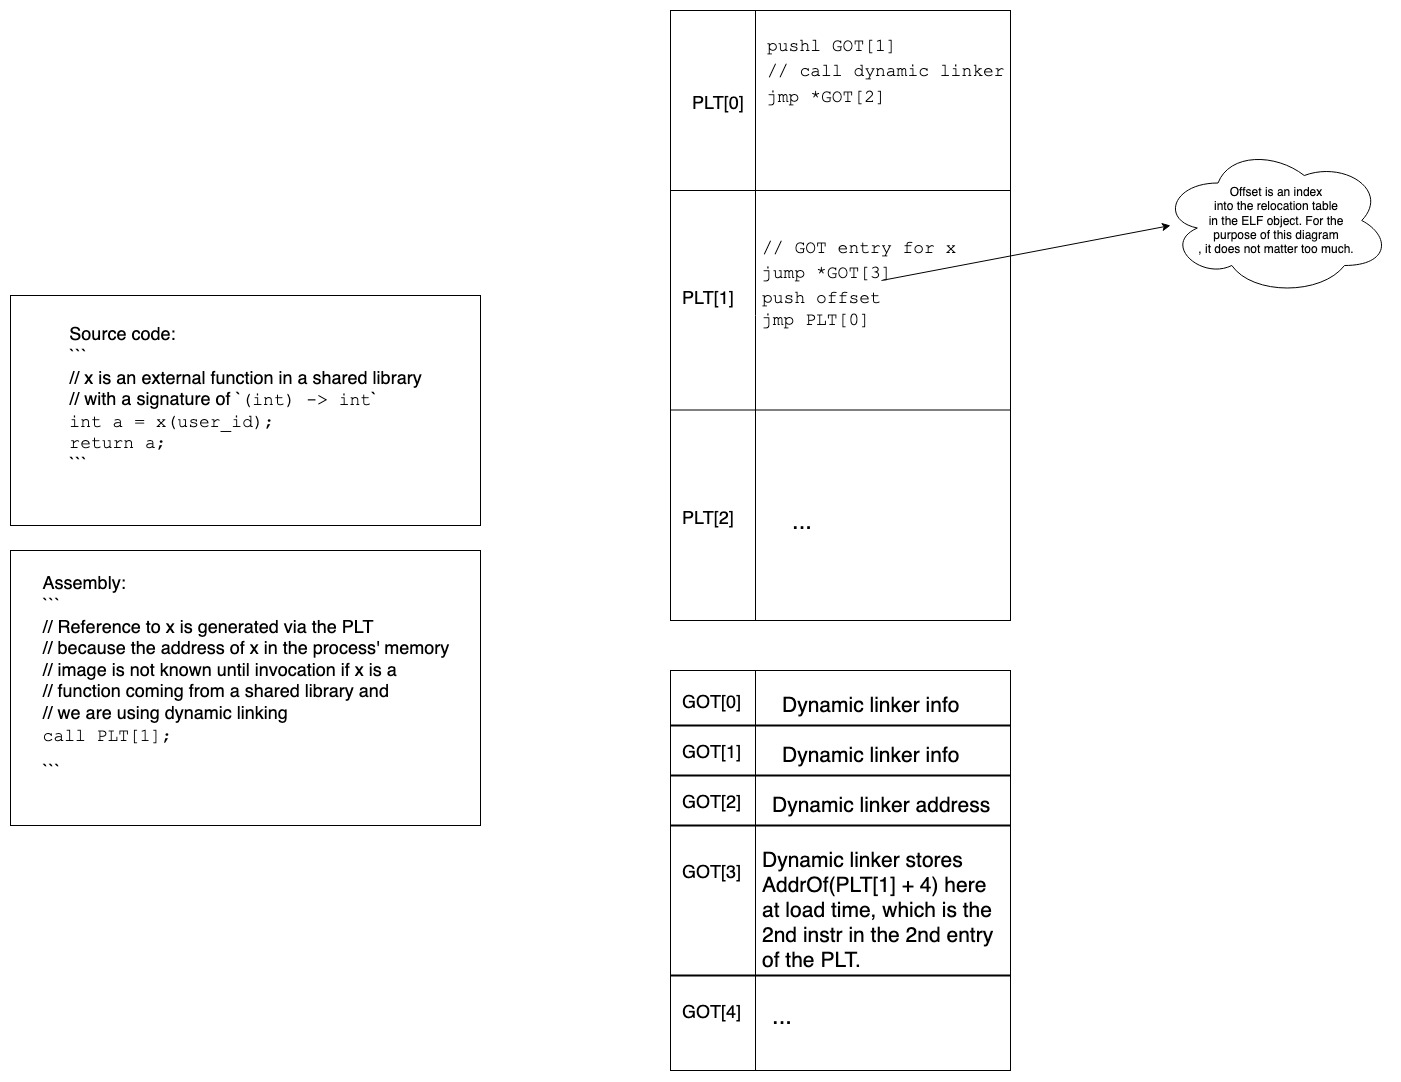
-
在第一次调用时
- 控制跳转到 PLT[1]
- PLT[1] 的第一个指令将控制权转移到 *GOT[3](存储在 GOT[3] 中的地址)。
- 请记住,存储在 GOT[3] 中的地址是 PLT[1] 的第二个指令的地址。
- 等等,所以我们一路走到 PLT,然后一路走到 GOT,然后再回到 PLT[1] 的下一个指令。我们本来会按顺序处理指令,我们会到达那里。为什么我们要走这条迂回路线?
- 我们马上就会看到!
- 一旦我们进入 PLT 的第二个指令,我们在堆栈上压入一个值(这个值在这里并不重要)。
- 然后控制跳转到 PLT[0],从那里您可以看到它最终跳转到存储在 GOT[2] 中的地址。
- 存储在 GOT[2] 中的地址是谁的地址?动态链接器的!
- 然后,动态链接器继续将 x(我们调用的外部库函数)链接到进程中,并将 GOT[3] 中的地址(最初是 PLT[1] 中第二个指令的地址)修复为 x 在进程中的新地址。
- 然后动态链接器调用 x,这就是用户最初想要做的。
- 后续调用
- 对 x 的第一次调用看起来像这样 -
- PLT[1] → *GOT[3] → PLT[1] → PLT[0] → *GOT[2] → x()
- 但是,由于动态链接器现在已修复 GOT[3] 中的条目以反映 x 的地址,因此对 x 的后续调用如下所示 -
- PLT[1] → *GOT[3](本质上是调用 x,因为这就是 GOT[3] 现在存储的内容)
- 对 x 的第一次调用看起来像这样 -
-
通过上述过程,动态链接使我们能够在位置无关代码中调用函数。此外,它使常见情况(除第一次调用之外的每次调用 x)更快!
脚注
-
AOT,静态编译语言 - C、C++、Rust,与解释型语言(如 Java)不同,没有可以在运行时扩展以引入新符号并为它们执行符号解析的运行时。例如,Java 拥有 Java 虚拟机 (JVM),它的 加载和链接 行为可以定制以实现上述任务。 ↩︎
-
JIT 链接主要在预编译语言的链接上下文中很有用(这无疑是它的灵感来源),但它不仅在该上下文中很有用。在 LLVM JITLink 中,通过 JITLinkContext,您可以链接到其他(非静态编译)代码,因此它对任何想要与在运行时链接的 C/C++ 交互的人都有用。理论上,您也可以用它来建立一个纯 JIT 语言(我认为 Julia 就是这样做的)。优点是与现有语言、编译器、工具的互操作性,缺点是与直接管理自身链接的自定义 JIT 相比,它很笨重。 ↩︎
-
Clang-REPL 旨在将 Cling(一个独立的工具)移入 LLVM 基础设施。 ↩︎
-
实际上,给定一个合适的 JITLinkContext,JITLink 甚至可以将对象链接到不同的进程。LLDB 使用此功能(通过 LLVM 的旧 MCJIT API)在调试器中 JIT 链接表达式,但在被调试的进程中运行它们,该进程可能位于不同的机器上。 ↩︎
-
我发现以下 2 种资源对于理解交叉编译非常有用。
- 《LLVM 核心库入门》一书的“跨平台编译”章节。
- Clang 文档,用于交叉编译。
-
动态链接的代码实际上可以使用“静态”重定位模型,但位置无关模型通常更受青睐。在位置无关代码中,您只需要修复 GOT,而在静态代码中,您需要修复每个外部引用,这会影响启动时间。 ↩︎